android


My Gradle Tips and Tricks

gradle_logo

The new Android build system is based in Gradle, an advanced build tool that simplifies build automation.

I used Maven for many years and Gradle project structure is very similar, but Gradle configuration files are Groovy-based and much (much!) more simple. Here is the official documentation

This week I migrated a lot of my Android and GWT projects to Gradle (some of them in my github), and here are some tips that I discovered (and I will add more as I find them):

Embrace the new Source Structure

Initially can be difficult, but putting the code under /src/main/java/, Android resources in /src/main/res/, etc. is a very popular form to organize the code. You can configure the build.gradle file to keep the old Android project structure, but I suggest migrating to the new structure.

Reference Another Project in your Workspace

You have two options:

  1. Use a Multi-Project Build
  2. Install the artifact (JAR if is a standard Java library, AAR if an Android Library) in your local Maven repo

Both options are explained below:

Use Multi-Project Builds

You can create a multi-project setup with projects on subfolders adding a settings.gradle file at the root with a include statement:

include 'library-project', 'your-project'

Then inside a your-project’s build.gradle you can easily add a dependency to another project (called “other_project”):

dependencies {
    compile project(':library-project')
}

Sample here.

Install a JAR to your Local Maven Repo (with the source code)

With standard java libraries and a build.gradle file like:

apply plugin: 'java'
apply plugin: 'maven'
group = 'com.company'
version = '0.8'

You can do “gradle install” to copy it yo your Maven repo.

Manually Install a JAR to your Local Maven Repo (without source code)

At the moment a lot of Google artifacts (=JARs, AARs) are not available at the Maven Central repo, but you can install them manually to your local Maven repo

mvn install:install-file -Dfile=android-support-v4.jar -DgroupId=com.google -DartifactId=android-support-v4 -Dversion=0.1 -Dpackaging=jar

You can also do it with gradle, but it is a bit more complex sample here.

Reference an Artifact from your Local Maven Repository

Be careful to add mavenLocal() to your repositories in the build.gradle:

repositories {
    mavenLocal()
}

Then use a normal reference, for the android-support-v4.jar sample above, it will be:

dependencies {
    compile 'com.google:android-support-v4:0.1'
}

Install an AAR to the Local Maven Repository

AAR is the new package format for Android Libraries. The “gradle install” task (that should install the AAR in the local Maven repository) does not works as expected in those projects, so I use a little hack:

apply plugin: 'maven'
uploadArchives {
  repositories {
    mavenDeployer {
      repository url: 'file://' + new File(System.getProperty('user.home'), '.m2/repository').absolutePath
    }
  }
}
task install(dependsOn: uploadArchives)

Usage sample here.

Android Library Projects need an Application Tag

This is an ADT bug, and the workaround is to add an empty application tag yo your library’s AndroidManifest.xml

<?xml version="1.0" encoding="utf-8"?>
<manifest xmlns:android="http://schemas.android.com/apk/res/android" ...>
    <application />

Include all the JARs in the libs/ Directory

This was the default behaviour of Android Projects, to maintain it you can add to your build.gradle:

dependencies {
    compile fileTree(dir: 'libs', include: '*.jar')
}

I suggest referencing local JARs only in final Android projects, referencing them in libraries can cause problems, read below:

Avoid Referencing Local JARs in Android and Java Libraries

If you reference local JARs in Android libraries, those jars are going to be embedded in the AAR. If you reference again the JAR from a project that uses the AAR you will see this build error:

:project:dexDebug
UNEXPECTED TOP-LEVEL EXCEPTION:
java.lang.IllegalArgumentException: already added: Landroid/support/v4/app/ActivityCompatHoneycomb;
//..
1 error; aborting
:project:dexDebug FAILED

If an Android Library projects references a JAR library, and the JAR library references local JAR files, those local JAR files are not going to be embedded in the Android projects using the library.

The best solution is to install all the JARs to your local Maven repo as explained above.

Or Embed all the Dependency JARs Into your Library

In some situations you may embed all the JARs in your library, but ONLY if those dependency JARs are not going to be referenced again in a project that uses the library.

jar {
    from configurations.compile.collect { it.isDirectory() ? it : zipTree(it) }
}

Android Projects Need Libraries Compiled with Java 1.6

If in an Android Project you use a library JAR including classes compiled with source compatibility to Java 1.7, build gives this WARNING:

trouble processing:
bad class file magic (cafebabe) or version (0033.0000)
...while parsing Class

…and the class is not included in the APK, so the app force closes at running.

This may be solved adding in the build.gradle of the library:

apply plugin: 'java'
sourceCompatibility = 1.6
targetCompatibility = 1.6

Create a Source JAR for a Library

Source JARs are needed for libraries used in GWT projects. To generate them add this to your build.gradle:

apply plugin: 'maven'
//...
task sourcesJar(type: Jar, dependsOn:classes) {
    classifier = 'sources'
    from sourceSets.main.allSource
}
artifacts {
    archives sourcesJar
}

You can install them to your local repo with “gradle install”

Include a Source JAR from Another Project

For multi-project_builds:

dependencies {
    compile project(':other_project')
    compile project(path: ':other_project', configuration: 'archives')
}

Sample here.

Include a Source JAR from a Maven Repo

Simply append “:sources”:

dependencies {
    compile 'com.company:artifact-name:0.8'
    compile 'com.company:artifact-name:0.8:sources'
}

Setting up the GoogleTV Emulator

Many people has problems with the Google TV Emulator because it hangs up booting at the Google TV logo. The problem is that it only works with specific device configurations and resolutions.

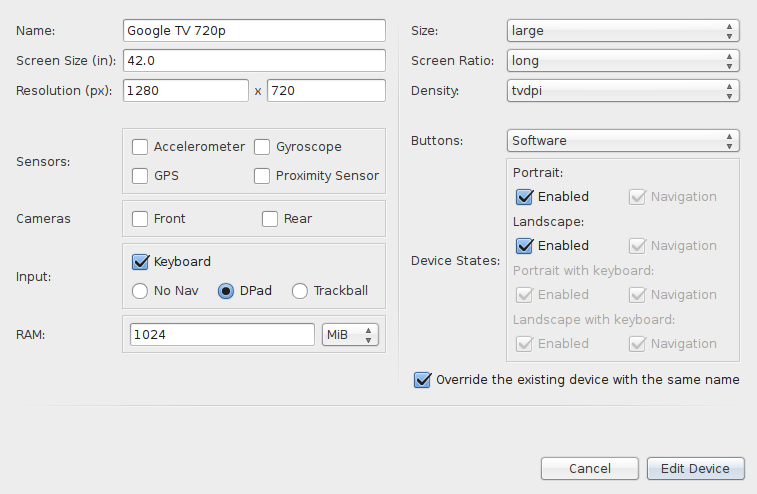
First you need to install the “GoogleTV Emulation Addon” using the Android SDK Manager. Then, create a new “Device Definition” (notice the new “Device Definition” tab at the top of the Android Virtual Device Manager in the lasts Android SDKs).

When prompted for the device definition parameters you must enter:

googletv1

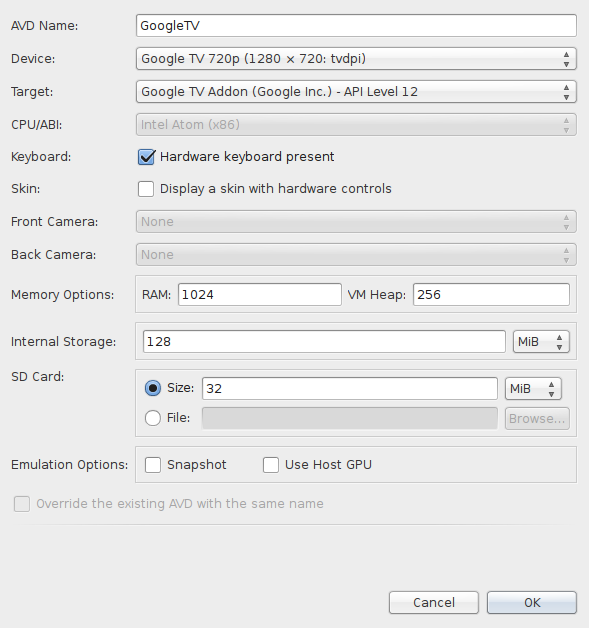
This setup is for a 720p resolution, for a 1080p you must change the resolution to 1920×1080 and the density from tvdpi to xhdpi. Once the device definition is created, the next step is to create a new Android Virtual Device using it:

googletv2

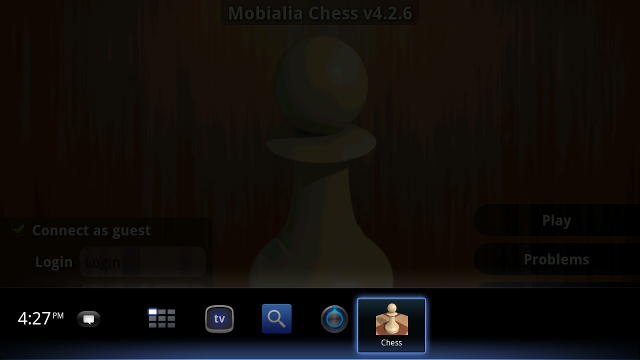
Et voilà, our Google Tv emulator is up and running:

googletv3

DevFest-X BCN 2012

For those who don’t follow me in the social networks, I’m now a co-organizator of the GDG Vigo (Google Developers Group), founded by Reinaldo Aguilera. In this group we are organizating a lot of interesting (and free!) Android and HTML5 activities (speechs, codelabs…) near Vigo, Galicia. Join to our Google Group and stay tuned!

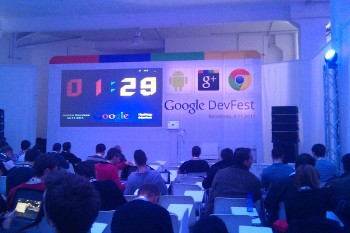
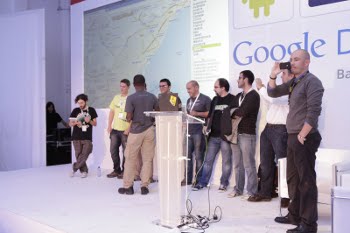
This year I also went to the Barcelona DevFest, but as GDG Vigo we tried to help with the organization.

We participated in a Three.js codelab with Ricardo Cabello (Mr.Doob) showing how to make a very simple WebGL game in some simple steps. Slides are available at:

http://www.alonsoruibal.com/slides/codelab_three.js/

and source code is hosted in github: https://github.com/albertoruibal/codelab_three.js/

In another session I also told my experience migrating some Mobialia apps from Android to HTML5 with GWT, those slides are at http://www.alonsoruibal.com/slides/android2gwt/

Thanks Google, GDG Barcelona and GDG Tarrragona for the organization of such great event!


MobileCONGalicia 2011

El viernes pasado, y gracias a la iniciativa de María Encinar (@encinar) y Martín Pérez (@mpermar), se llevó a cabo el primer evento para desarrolladores móviles en Galicia: MobileCONGalicia.

Las ponencias fueron de los más variado, tuvimos a:

  • Eugenio Estrada (@eugenioestrada) un crack de Windows Phone nos metió a todos el gusanillo de desarrollar en WP
  • Alberto Gimeno (@gimenete), desarrollador iOS nos habló de posibilidades de monetización de apps
  • Elena Pérez (@ilnuska) experta en interfaces de usuario en @SpartanBits, puso a caldo (con conocimiento de causa) al equipo de diseñadores de Android
  • Ricardo Varela (@phobeo), experimentado desarrollador curtido en 1000 batallas, habló de APIs móviles
  • Martín Pérez (@mpermar), nos habló de Tropo, Phono y otras APIs de telefonía dándonos grandes ideas de oportunidades de negocio
  • Hermes Piqué (@hpique) experimentado desarrollador Android e iOS que nos habló de Unit Testing
  • Jordi Bonet de Softonic explicó como han reinventado su negocio orientándolo hacia las descargas móviles
  • Finalmente, Nacho Sanchez nos contó su experiencia empresarial en @InqBarna desarrollando apps

Algunas de las presentaciones se pueden visualizar aquí

Yo participé con una ponencia sobre Android, y como la entrada al evento eran 25 euros (una ganga por cierto), hice una presentación con mis 25 consejos para los que comienzan a desarrollar; ya sabéis, a euro por consejo:

El evento terminó con un AppCircus del que fuí jurado junto con Miguel Sílva (@MSilvaConstenla de @Blusens, Elena (@Ilnuska) de @SpartanBits y Nacho de @INQBarna. Estas fueron las aplicaciones que se presentaron:

  • PictoDroid: Excelente aplicación Android para permitir a las aplicaciones con problemas de expresión comunicarse mediante pictogramas
  • Mussage: Aplicación IOS que permite enviar mensajes con canciones que están en la biblioteca del receptor
  • Chove: Completo radar de lluvia para españa en Android
  • Extremadura Rural: Guía offline de alojamientos rurales en Extremadura
  • ReallyLateBooking: Aplicación IOS y Android para buscar ofertas de hoteles en el mismo día
  • Binaurality: Método para aprender inglés basado en la escucha binaural para IOS y Android
  • Bits4Meetings: Iniciativa para proporcionar un sistema de creación de aplicaciones para eventos personalizadas (de los creadores de Ipoki!)
  • Berokyo: Aplicación iOS que permite organizar en estanterías documentos, contactos y medios digitales, sincronizándolos con DropBox
  • Obradoiros Abertos: Aplicación que ofrece información geolocalizada de talleres, tiendas y puntos de interés de artesanía gallega.
  • Absolute Defense: un shot’em up de gran calidad al más puro estilo R-Type

El nivel de las aplicaciones presentadas fué muy bueno. La app ganadora fue ReallyLateBooking, y la finalista Berokyo, esperamos haber sido justos. Mención especial me merece la presentación de Juan Porta de la aplicación Chove!, un tremendo showman más puro estilo gallego, que nos hizo pasar un momento estupendo, pena que no nos dejaran valorar la presentación.

Referencias en prensa/blogs:

Por si fuera poco y gracias a Blusens, tuvimos una fiesta del evento en una discoteca Santiaguesa, que se adentró en altas horas de la madrugada… Atención al detalle del gorro de Android de @IronSil, y curioso el efecto de “Ojos Blancos” de la cámara del Galaxy Nexus.


Google DevFest 2011 BCN

This week I assisted to the Google DevFest 2011 Barcelona. This year it was celebrated on a great “garage” located on an industrial area of Barcelona. I will tell the more interesting things that I found on the different sessions:

NEW IN HTML

As usual, this session presented by Paul Kinlan showed us the future of HTML5. I love the x-webkit-speech Chrome feature to make voice inputs that we already could see on the Madrid DevFest 2010. Paul made also some demos of WebIntents  a great idea to make something similar to Android intents on the web. Finally we could see that HTML5 is advancing very fast trying to implement many APIS that will make Flash obsolete, like window.navigator.getUserMedia() ot the Web Audio API.

GLSL

This session was presented by Mr. doob aka. Ricardo Cabello, a guy from the demoscene. He made a introduction of how 3D works in the browser and showed us how to use the GLSL language to make great effects on web pages. He has those GLSL demos on his blog.

GOOGLE+ SESSIONS

There were two Google+ sessions driven by Ade Oshineye, one presenting the new social network (also announcing the Google+ Pages) and other with more technical details for developers. One thing that you can do easily is adding the +1 button to your site. Other very interesting tools that we could see were the Google APIs Console and the Google APIs Explorer.

ANDROID SESSIONS

Bruno Oliveira is replacing Reto Meier as our “Android Developer Relations”.  On the first session he made a great review of the Android platform evolution since 2.1 to 4.0. On the second session he gave us great tips to improve UX experience on Android. This guy is a showman!

MAKING A BUSSINESS OUT OF APPS

This session was presented by Paul Kinlan and Bruno Oliveira, showing us that monetization tips are valid for both web and Android apps: Lazy registration, try before you buy, easy payment, in-app payments… Bruno also presented the new multilingual “Guide to the App Galaxy” http://www.guidetotheappgalaxy.com/.

GOOGLE SHOPPING API

Daniel Hermes showed us the Google Shopping API and many integration samples.

CHROME DEV TOOLS

Finally Sam Dutton made a review of the Google Chrome development tools. This tools replaced my FireBug many years ago! He also made his slides available.

APP COMPETITION

This year Google also organized and Appcircus-style app competition. Those were the apps and sites presented:

I won the app competition, but all were great apps. Our presentation and some photos of the app competition are available at our Mobialia Blog.


Developing with Android-X86 2.3 and VirtualBox

One of the most tedious thing developing for Android is the lack of an efficient emulator. The bundled Android emulator with the SDK is very, very slow due to that it is emulating an ARM architecture over X86 processors.

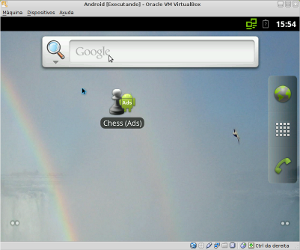
So I will propose you a solution based on Android-X86. This is a project that ports Android to the X86 architecture and they recently released the 2.3 RC1 version. With VirtualBox you can create a X86 virtual machine and install Android-X86 on it.

First, install VirtualBox and create a virtual machine with the following specs:

  • Operating System: Other
  • 512 MB RAM and 5 GB HD (enough)
  • Bridged Network (easier for the adb connect step)
  • Emulating a Sound Blaster 16 sound card (trying it as recommendation from Android-X86, but at the moment it doesn’t work for me)
Then download the android-x86-2.3-RC1-eeepc.iso image (see links at the bottom).

When you start VirtualBox by first time it will ask you for a boot CD, select the downloaded image. On start it will let you choose between running Android from the CD or install it on hard disk. Select install to hard disk, create a partition on the virtual disk, and install Android on the partition selecting  the “System read write” option.  During the installation process, you can create a virtual SD card (of 2GB maximum), the SD card is necessary for many apps to word.

Then you can now start your Android-X86 system (don’t forget to remove the ISO image). By default it will have the ethernet networking configured, you can check it at Settings->Ethernet configuration.

To start developing with this virtual machine, you need to connect it to your computer via adb. Android-X86 includes by default an adb server listening on port 5555. On the virtual machine get your IP address pressing “ALT-<F1>” and typing netcfg (press “ALT-<F7>” to go back to the graphic screen). Then, on your computer type

adb connect <IP>:5555

Replacing <IP> with your virtual machine IP. Now the emulator is connected with adb to your machine and you can run apps on the emulator pressing play on Eclipse or start a shell in the emulator with adb shell…

The Android X86 virtual machine is much faster than the emulator. Take into account that native apps will not work on Android-X86, but Google-TV is also X86 based, so it seems that the X86 platform will be longer supported on the future.

UPDATE: There is also a HoneyComb image at Android-X86 Google Code page that works on VirtualBox but without network (at the moment it does not support Ethernet) so it is not very usable for development.

Mobile 2.0 Open Ideas

This year I was invited to organize a workshop at the Mobile 2.0 Open Ideas event at Barcelona, on 16-17 June. With my experience developing Android apps at Mobialia and the social media integration on Martin Varsavsky’s RadioMe, I proposed the workshop:

Bulding Social Media Enabled Android Apps

This will be a 1-hour workshop In which I’ll provide some examples on how to integrate social media on Android apps, from the simple “Share” button to more complex integrations like using Twitter, LinkedIn or Facebook APIs, including logging-in with social media, the “Like” button, etc.

I will try to do it interesting for developers and also for app designers who want to add cool social features to their apps. Slides and code samples will be available from the day of the event.


SobrosoParty 2011

Hoxe sábado ás 18 horas repetimos o laboratorio de Android “A Miña Primera Aplicación Android” na SobrosoParty no Pavillón Municipal de Ponteareas. Neste taller usaremos como exemplo a aplicación WikiPlaces para explicar cales son os pasos da creación dunha aplicación Android, dende a instalación do SDK e a configuración do Eclipse ata a súa publicación no Android Market.

Esta aplicación ten moitos exemplos de cousas típicas na programación de Android:

  • Deseño de layouts
  • Obte-la ubicación
  • Amosar un mapa e usar overlays para representar información sobre él
  • Amosar unha lista utilizando adapters
  • Obter datos de servidores externos
  • Usar intents para lanzar outras aplicacións dende a nosa
  • Introducción de Anuncios de AdMob

Tentaremos condensa-lo taller en dúas horas que é pouco tempo, xa que no último LabAndroid en Málaga seis horas non chegaron para moito, pero como creo que non vai haber nen enchufes nen ordenadores para todos tentaremos facelo un pouco máis xeral.

Para asistir a este taller non fai falta estar incribito na SobrosoParty (que ten só 300 plazas), con dicirlle a persoa de seguridade que se vai asistir ó taller de Android non debería haber problema en pasar.

Notas de prensa:


Using styles on Android layouts

A very cool feature of Android that many developers do not know (at least me 6 months ago) is the possibility of using “styles” on Android XML layouts. This thing is similar to CCS on HTML and provides a method to simplify the XML design.

First, let’s see an example of a XML layout without styles, you can notice the need to repeat attributes and the difficulty of reading the XML:

<LinearLayout
 android:layout_width="wrap_content"
 android:layout_height="wrap_content"
 android:orientation="vertical">
 <TextView
  android:text="@string/text1"
  android:layout_width="wrap_content"
  android:layout_height="wrap_content"
  android:textStyle="bold"
  android:textColor="@color/white"
 />
 <TextView
  android:text="@string/text2"
  android:layout_width="wrap_content"
  android:layout_height="wrap_content"
  android:textStyle="bold"
  android:textColor="@color/red"
 />
</LinearLayout>

But we can define styles grouping this attributes on the file res/values/styles.xml

<?xml version="1.0" encoding="utf-8"?>
<resources>
 <style name="VerticalLinearLayout">
  <item name="android:layout_width">wrap_content</item>
  <item name="android:layout_height">wrap_content</item>
  <item name="android:orientation">vertical</item>
 </style>
 <style name="WhiteText">
  <item name="android:layout_width">wrap_content</item>
  <item name="android:layout_height">wrap_content</item>
  <item name="android:orientation">vertical</item>
  <item name="android:textStyle">bold</item>
  <item name="android:textColor">@color/white</item>
 </style>
 <style name="RedText" parent="@style/WhiteText">
  <item name="android:textColor">@color/red</item>
 </style>
</resources>

Note te possibility of  inheriting styles, in this example “RedText” is inherited from the “WhiteText” style changing only the text color.

Our XML layout, with styles, gets reduced to:

<LinearLayout style="@style/VerticalLinearLayout"/>
 <TextView style="@style/WhiteText"
  android:text="@string/text1"
 />
 <TextView style="@style/RedText"
  android:text="@string/text2"
 />
</LinearLayout>

Finally,  you can see that I’m using colors (@color/white and @color/red) which must be defined on the file res/values/colors.xml (in a similar way to strings):

<?xml version="1.0" encoding="utf-8"?>
<resources>
 <color name="white">#ffffffff</color>
 <color name="red">#ffff0000</color>
</resources>

A small problem with the facebook Android SDK

At Mobialia the lasts weeks I was involved on the development of a social app using , among other social networks APIs, the facebook API.

For me it was easier to implement Twitter API access using only the signpost library, for facebook they recommend to download their Android SDK, and I did so. First we need a class attribute with the Facebook object:

Facebook fb = new Facebook(appId);

The problem is during the autentication process: we must call the fb.authorize method…

fb.authorize(this, PERMISSIONS, ACTIVITY_CODE, this);

And wait for the result of this called activity on our onActivityResult method

protected void onActivityResult(int requestCode, int resultCode, Intent data) {
    fb.authorizeCallback(requestCode, resultCode, data);
}

But, here is the problem, under heavy memory requierements (like testing on a old HTC Magic) the caller activity may be killed, and the status of the Facebook object is not maintained so the call to authorizeCallback is going to fail.

Then I need a method to mantain the Facebook object status, and here comes the hack. I added this method to the Facebook object:

public void setStatus(int mAuthActivityCode, DialogListener mAuthDialogListener){
    this.mAuthActivityCode = mAuthActivityCode;
    this.mAuthDialogListener = mAuthDialogListener;
}

And I call this method on my OnActivityResult:

protected void onActivityResult(int requestCode, int resultCode, Intent data) {
    fb.setStatus(ACTIVITY_CODE, this);
    fb.authorizeCallback(requestCode, resultCode, data);
}

Note that the DialogListener is the same Activity. Other solution may be to avoid killing of the caller activity, but I don’t figure how…