Avatar and stereoscopic 3D screens

Now that the new Avatar movie was released, it’s time to remember what happened when the first Avatar was released in 2009: It unleashed a craze about stereoscopic 3D movies & TVs.

2010 was declared “The year of 3D TV”. Somehow it was assumed that we were going to watch TV with glasses. I remember “experts” saying ‘In the future all the TVs will be 3D”.

I went to the cinema a couple times to watch 3D movies, and at the begining it was fun to try, but I got bored soon. I also bought a TV without 3D.

There was a lack of 3D content, and some movies where converted to 3D with algorithms producing a mediocre result. Also 3D viewing was causing headaches in a lot of people.

Nintendo joined the trend in 2011 launching the 3DS, that was showing 3D without glasses. But almost everybody was using it with the 3D deactivated, and in 2013 they launched the 2DS, without the 3D.

The production of 3D TVs ended in 2016 putting an end to this trend.

I remember this every time that someone says we are going to use VR headsets for work. Glasses, stereoscopic view, trends, headaches…


OpenAI’s ChatGPT chatbot

OpenAI is a research institute that focuses on conducting research in the field of artificial intelligence. The organization was founded in 2015 with the goal of promoting and developing friendly AI, which refers to AI that is aligned with human values and that can be used to improve the lives of people. OpenAI conducts research in areas such as machine learning, robotics, and economics in order to advance the understanding and capabilities of AI. The organization is supported by a number of high-profile investors and has made significant contributions to the field of AI.

GPT is an acronym that stands for “Generative Pretrained Transformer.” It is a type of large language model that uses deep learning techniques to generate human-like text. It was developed by the research lab OpenAI, and is designed to be able to generate text that is indistinguishable from text written by a human. GPT models are trained on massive amounts of text data, and can generate responses to questions and prompts in a variety of languages and styles. They are often used for a wide range of applications, including language translation, text summarization, and conversation.

As a large language model trained by OpenAI, this chatbot is a type of artificial intelligence that is designed to generate natural language responses based on the input that it receives. It uses machine learning algorithms to process and analyze the input, and then generates a response based on the information that it has been trained on.

This chatbot does not have access to the internet, so it cannot browse or search for information online. Instead, it relies on the knowledge and information that it has been trained on to generate its responses. It is constantly learning and improving, so its responses may become more accurate and relevant over time.

Users can interact with this chatbot by typing in questions or statements, and the chatbot will generate a response in natural language. The specific capabilities and functionality of this chatbot will depend on its design and training.

And now the most interesting part: ALL THE ABOVE TEXT WAS GENERATED BY CHATGPT. It was done by asking it “What is OpenAI?”, “What is GPT?’ and “Tell me how this chatbot works in third person”. Surprised? Me too.

https://chat.openai.com/

Official announcement: https://openai.com/blog/chatgpt/


Fixing an old dehumidifier with Arduino

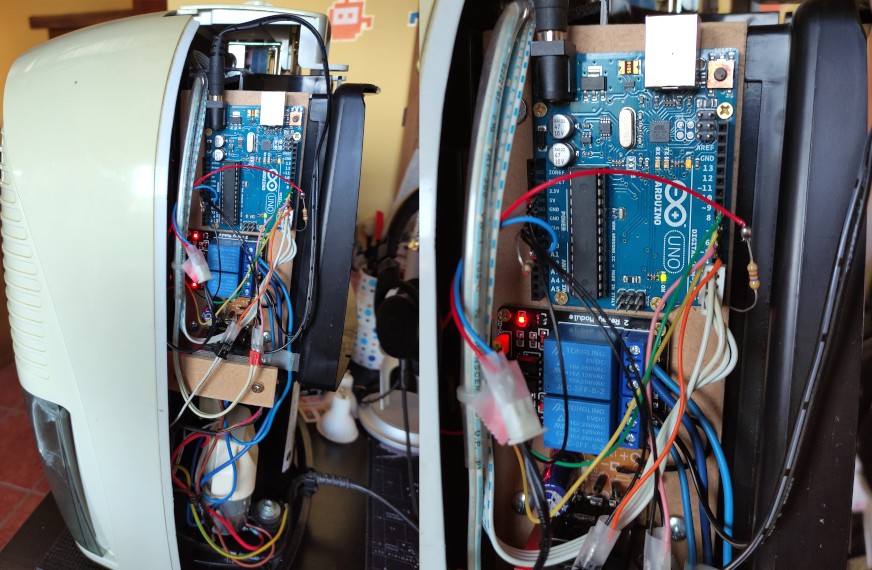
I purchased an Arduino UNO board approximately 10 years ago and conducted various experiments with it. Recently, my old Delonghi DEM 10 dehumidifier ceased to function due to a board issue, and the cost of replacing the original board was approximately 60€. Instead, I opted to replace the faulty board with the Arduino UNO and a two-relay board (designated for the compressor and fan).

BOM:

  • Arduino UNO: 20€
  • Relay board: 5€
  • 12V transformer: found at home
  • ~1€ in cables and screws
  • A resistor
  • Wood recycled from a packaging

And a new dehumidifier with the same specs costs ~150€, but I didn’t do this for the money….

I had a lot of fun coding the program to manage the sensors and the timer. I remembered how thermistors work and implemented the defrost and the overheat protection with a state machine, repurposing the leds to show the states. After stopping the compressor we need to wait ~20 seconds before starting it again (because the capacitor needs to be loaded).

This is the source code, it uses the thermistor library.:

#include "thermistor.h"

const int STATUS_IDLE    = 0;
const int STATUS_WORKING = 1;
const int STATUS_PAUSE   = 2;

const int PIN_FULL        = 6;
const int PIN_HIGRO       = 7;
const int PIN_COMP        = 8;
const int PIN_VENT        = 9;
const int PIN_THERMISTOR  = A0;
const int PIN_LED_ON      = 4;
const int PIN_LED_DEFROST = 3;
const int PIN_LED_PAUSE   = 2;


const long TIME_WAIT               = 50;
const long TIME_BEFORE_PAUSE       = 25 * 60 * 1000L;
const long TIME_PAUSE_TIMER        =  5 * 60 * 1000L;
const long TIME_PAUSE_DEFROST      = 10 * 60 * 1000L;
const long TIME_PAUSE_OVERHEAT     = 10 * 60 * 1000L;
const long TIME_PAUSE_COMP_OFF     = 30 * 1000L;

const int TEMP_DEFROST  =  30; // IN 1/10 ºC
const int TEMP_OVERHEAT = 350; // IN 1/10 ºC

int status = STATUS_PAUSE;

long workingTimer  = TIME_BEFORE_PAUSE;
long pauseTimer = TIME_PAUSE_COMP_OFF;

THERMISTOR thermistor(PIN_THERMISTOR,        
                      10000,          // Nominal resistance at 25 ºC
                      3950,           // thermistor's beta coefficient
                      10000);         // Value of the series resistor

void setup() {
  Serial.begin(9600);
  
  pinMode(PIN_FULL, INPUT_PULLUP);
  pinMode(PIN_HIGRO, INPUT_PULLUP);
  
  pinMode(PIN_COMP, OUTPUT);
  pinMode(PIN_VENT, OUTPUT);
  digitalWrite(PIN_VENT, HIGH);
  digitalWrite(PIN_COMP, HIGH);

  pinMode(PIN_LED_ON, OUTPUT);
  pinMode(PIN_LED_DEFROST, OUTPUT);
  pinMode(PIN_LED_PAUSE, OUTPUT);
  digitalWrite(PIN_LED_ON, HIGH);
  digitalWrite(PIN_LED_DEFROST, HIGH);
  digitalWrite(PIN_LED_PAUSE, HIGH);
}

void loop() {
  long t1 = millis();

  boolean full = digitalRead(PIN_FULL);
  boolean higroOff = digitalRead(PIN_HIGRO);
  uint16_t temp = thermistor.read();

  // Status changes
  switch(status) {
    case STATUS_WORKING: {
      if (full || higroOff) {
        Serial.println("Stopping...");
        status = STATUS_PAUSE;
        pauseTimer = TIME_PAUSE_COMP_OFF;

      } else if (temp < TEMP_DEFROST) {
        Serial.println("Pausing to defrost...");
        status = STATUS_PAUSE;
        pauseTimer = TIME_PAUSE_DEFROST;

      } else if (temp > TEMP_OVERHEAT) {
        Serial.println("Pausing due to overheat ...");
        status = STATUS_PAUSE;
        pauseTimer = TIME_PAUSE_OVERHEAT;

      } else if (workingTimer <= 0) {
        Serial.println("Pausing due to timer...");
        workingTimer = TIME_BEFORE_PAUSE;
        status = STATUS_PAUSE;
        pauseTimer = TIME_PAUSE_TIMER;
      }
      break;
    }

    case STATUS_IDLE: {
      if (!full && !higroOff) {
        Serial.println("Starting...");
        status = STATUS_WORKING;
      }
      break;
    }

    case STATUS_PAUSE: {
      if (pauseTimer <= 0) {
        status = STATUS_IDLE;
      }
      break;
    }
  }

  // New statuses and timer update
  switch(status) {
    case STATUS_WORKING: {
      Serial.println("Working");
      digitalWrite(PIN_VENT, LOW);
      digitalWrite(PIN_COMP, LOW);

      digitalWrite(PIN_LED_ON, LOW);
      digitalWrite(PIN_LED_DEFROST, HIGH);
      digitalWrite(PIN_LED_PAUSE, HIGH);
      break;
    }

    case STATUS_IDLE: {
      Serial.println("Idle");
      digitalWrite(PIN_VENT, HIGH);
      digitalWrite(PIN_COMP, HIGH);

      digitalWrite(PIN_LED_ON, HIGH);
      digitalWrite(PIN_LED_DEFROST, LOW);
      digitalWrite(PIN_LED_PAUSE, HIGH);
      break;
    }

    case STATUS_PAUSE: {
      Serial.println("Paused");
      digitalWrite(PIN_VENT, LOW);
      digitalWrite(PIN_COMP, HIGH);

      digitalWrite(PIN_LED_ON, HIGH);
      digitalWrite(PIN_LED_DEFROST, HIGH);
      digitalWrite(PIN_LED_PAUSE, LOW);
      break;
    }
  }

  // Pause and timer updates
  Serial.print("Temp in 1/10 ºC : ");
  Serial.println(temp);

  delay(TIME_WAIT);
  long t2 = millis();

  switch(status) {
    case STATUS_WORKING: {
      workingTimer -= t2 - t1;
      Serial.println(workingTimer);
      break;
    }

    case STATUS_PAUSE: {
      pauseTimer -= t2 - t1;
      Serial.println(pauseTimer);
      break;
    }
  }
}

And it feels like if I do not suck at electronics anymore 🙂


LaretasGeek AMA

Los compañeros de LaretasGeek (https://twitter.com/laretasgeek) están llevando a cabo una iniciativa de entrevistas en cadena “AMA” (Ask Me Anything) en la que el entrevistado de cada semana escoge a un invitado y lo entrevista la semana siguiente.

En esta cadena de entrevistas, Eloy Coto de Red Hat escogió entrevistarme a mí, y esta fue la entrevista:

https://www.youtube.com/watch?v=aJkifnWjug0

Una semana después, yo escogí entrevistar a Antón Román, CTO de Quobis, y nos quedó otra entrevista muy chula:

https://www.youtube.com/watch?v=jvFiG1ukAWc


The way of St. James by bike

I just finished my third way of St. James by bike, the french way. This was the first time that I am able to finish without too much incidents, so I’m telling my experience.

My ways

In the last years I have done these:

  • Northern way (Camino del norte): It is the prettiest but the most difficult, with lots of slopes. I made Irun-Santiago in 13 days, but I had lots of mechanical problems with my bike and I suffered the rain. It was August and hostels were always full, so I made it from camping to camping.
  • Silver way (Vía de la Plata): I made it in July starting from Seville, it was too hot, and it is very easy to run out of water. I drank 7 liters of water per day. There aren’t fountains in the way and there are very long sections without bars or shops. I fell ill and I had to go back home from Salamanca.
  • French way (Camino francés): It is he easiest but it is crowded. I just made Pamplona-Santiago in 8 days. I made it in June and there was enough room in hostels and the climate was pretty favorable.

I followed always the Eroski guide, but it is in spanish: http://caminodesantiago.consumer.es/. I also used the GPX Viewer android app with tracks downloaded from Wikiloc to help when I get lost.

The bike

You do not need a very strong bike to make the way. You can make it with a road bike, but I prefer to go off-road with a mountain bike and make it following the same path than walking pilgrims.

I use pannier bags and a small backpack where I carry less than 2Kg. Trying to carry all the weight in a backpack can be harmful. You will need additional space for the food and for the water, specially when making the Silver way.

The rear wheel may suffer with the additional weight, so it is better to have a rear tyre in good conditions. I suffered lots of punctures in the Northern way due to a tyre in bad conditions.

And install a bell, it is very important to warn walking pilgrims of your presence and to do not frighten them.

Do not try to go with your bike to the starting point by train, RENFE has serious issues carrying bicycles. It is possible to go by bus, most companies allow you to carry your bike in the trunk paying a small plus.

What to carry

Along the years, I optimized the things to carry, I made this last way carrying only 6.5 Kg:

  • Bike clothing: a t-shirt, a cycling short, glasses, gloves and cycling shoes. I wash the t-shirt and the short every day just after arriving to the hostel.
  • A cotton t-shirt: I use it also as pijama
  • A pair of light trousers
  • 3 x underpants and socks: I also wash my underwear every day
  • Flip flops: for the shower
  • Swimsuit: there are lots of beaches in the northern way and some swimming pools in the others, do not miss them!
  • Rain jacket
  • Sleeping bag: I also use it to sleep in hostels
  • Sleeping pad
  • Tent: I carry a 1 Kg High Peak Minilite, not very resistant to the water https://www.highpeak-outdoor.com/minilite-1038.html
  • Bike tools: I carry a very basic set of tools: a small bike multi-tool, a spare tube, a patch kit and a pair of spare braking pads.
  • A chain lock: I feel safer leaving my bike locked
  • A power bank: I leave it charging in the hostel (it is a minor loss if stolen) and then, during the day, I charge my phone

A pro-trick is to carry your wallet and your electronic devices in a small tupperware. It is an extra protection under the rain.

What to eat

You can find menus for pilgrims by 10 eur. The hostels have kitchen and you can cook there. On the bike, I try to eat the same calories that I am consuming: I carry fruit, sandwiches, cereal bars, cookies, etc. and I stop every hour to eat something.

Where to sleep

Hostels are the best option, I carry a tent as backup, but in my last way it was not necessary. Hostels are cheaper than campings, you can find some hostels by 5 eur/night. Some of the hostels, when they are full, allow you to sleep on the floor (so it’s useful to carry a sleeping pad) or outside, in a tent in the garden.

Most hostels ask you for the Credential, you can get it at many hostels by 2 or 3 eur.

The experience

It’s hard to explain, buy the way is a mix of culture, sport, fellowship and religion (not in my case) that make it a unique experience full of hard to forget moments, and, yes, so good and addictive that I made it three times…

Google Photos album with my French way: https://photos.app.goo.gl/XMJjDm9ZkCDrtbM49


Converting Carballo to Kotlin

Kotlin is a JVM language developed by JetBrains: http://kotlinlang.org gaining momentum among Android developers. Kotlin has interesting features like:

  • It can be compiled to bytecode compatible with Java >=6, allowing to use a lot of Java 7-8 features (lambdas…)  in Java 6 bytecode (=Android)
  • It can be transpiled to Javascript (like Java with GWT)

So I decided to migrate the Carballo Chess Engine code to Kotlin (and his name is Karballo) to make some experiments and having some “fun” :)… but it became a non-trivial task, the converted code is at: https://github.com/albertoruibal/karballo.

Converting the code

To start working with Kotlin I installed the Kotlin plugin for Android Studio (=IntelliJ) from:

File->Settings->Plugins->Install JetBrains Plugin

Once the Kotlin plugin is installed, it’s quite easy to convert java source files to Kotlin with: CTRL + SHIFT + ALT + K

Conversion problems

The Java to Kotlin code conversion does not work perfectly, the Carballo conversion arose these errors:

  • Kotlin is strong typed, you cannot compare a long against the literal ‘0’, you must use ‘0L’… I had hundreds of this comparisons
  • A Long cannot be initialized with an unsigned hex literal if the value does not fit in the signed type, it gives a “Value out of range” compilation error ,  so you cannot do:
    var variable = 0xffffffffffffffffL

    The solution is to convert the literals to a signed decimal:

    var variable = -1
  • Error “Property must be initialized or be abstract” with attributes not initialized in the constructor, solved adding the “lateinit” modifier to the declaration of the attributes (yes, Kotlin knows if you are initializing the attribute in the constructor)
  • Strange toInt() insertions:
    pieceNames.indexOf(pieceChar.toInt())

    should be:

    pieceNames.indexOf(pieceChar)
  • Variables of type Byte cannot be used as array indices, I had to manually change many vars from Byte to Int
  • Kotlin does not allow assignments in expressions, so it’s impossible to do:
    while ((node.move = node.moveIterator.next()) != Move.NONE) { 

    I manually had to change some cases to the more verbose:

    while (true) {
        node.move = node.moveIterator.next()
        if (node.move == Move.NONE) {
           break
        }
  • The binary operators do not work in multi line if they are placed at the beginning of the second line, only if they are at the end of the first, so:
    var myLong : Long = long1
        or long2

    does not compile, it must be:

    var myLong : Long = long1 or
        long2
  • It didn’t recognize some custom getters and I had to merge them manually, I like a lot how they look in Kotlin (notice the use of the special word “field” to avoid calling the getter recursively):
    var lastMoveSee: Int = SEE_NOT_CALCULATED
        get() {
            if (field == SEE_NOT_CALCULATED) {
                field = board.see(move, ai)
            }
            return field
        }
  • The conversion process got hung with two complex classes: CompleteEvaluator and ExperimentalEvaluator… I had to kill IntelliJ. I converted the CompleteEvaluator class copying to a new class small chunks of code.
  • Kotlin’s when() statement do not work like the Java’s switch->case, as it hasn’t breaks, you cannot jump from one option to the next excluding the break: the conversion duplicated a lot of the MoveIterator code and I fixed it manually.
  • Some other strange errors like wrong expressions and missing parenthesis…

Some things of Kotlin that I don’t like (yet)

Some are part of the claimed Kotlin “features”:

  • Kotlin does not has primitive types, but it seems to not affect the performance…
  • There is no ternary operator in Kotlin, it’s replaced with “if (…) … else …” expressions: This increases a lot the verbosity, al least in my code
  • Kotlin’s crusade against NullPointerExcepcions: It a type allows null, it must be explicitly indicated appending a question mark to the type:
    var myString : String? = null

    To convert a nullable var/val to a non-nullable, you should use the !! operator, this forces a NullPointerException if the value is null (and it seems that you are shouting to the IDE…):

    var myString : String? = "hello"
    var myStringNotNull : String = myString!!
  • Static fields and methods are grouped in a “Companion Object”
  • Compilation is slower than pure Java
  • Many bugs running from Android Studio non-android projects (IntelliJ worked better for me)
  • Couldn’t get the JS compilation working yet

And other things that I like

  • The full interoperability with Java
  • Type inference, normally I continue to specify the types, but in some cases it saves a bit of code
  • Data classes, they will save you hundreds of lines of boilerplate code https://kotlinlang.org/docs/reference/data-classes.html
  • Array initialization with lambdas
    nodes = Array(MAX_DEPTH, {i->Node(this, i)})
  • The singleton pattern is embedded in the language: using “object” instead “class” assumes that the class is a singleton
  • Visibility is “public” by default, with the access modifier “internal” it can be accessed only from the same module
  • Implicit getters / setters
  • No need for “new” to call constructors
  • And much more…

Performance

I’m my first tests, I’m not noticing any performance downgrade (or upgrade) over the Carballo Java version.


Improving Carballo Chess Engine the hard way

torneo_ajedrez

One year ago my Carballo Chess Engine (https://github.com/albertoruibal/carballo) was stuck: all the improvements that I was trying were not working, and I detected the main problem: I am a poor chess player so I will never be a good chess engine developer. I thought that the main chess programming skill was statistical analysis and not chess knowledge, but I was wrong.

So, I took the decision of starting to learn and play chess. I joined the local chess club Xadrez Ramiro Sabell (http://www.xadrezramirosabell.com) and I was so lucky that in this club teaches chess the International Master Yudania Hernández Estevez. It’s quite curious the amazing people that you can find in a small city like Ponteareas. I also try to help the club in the tournaments organization and with a small Mobialia sponsorship. Now I am playing the Galician Chess League (in third division) and all the tournaments that I can.

My chess level is improving fast (ok, I’m under 1600 ELO yet: http://ratings.fide.com/card.phtml?event=24597015), but the real deal is that the Carballo Chess Engine strength is improving much faster, climbing positions in the CCRL list (http://www.computerchess.org.uk/ccrl/4040/). Learning chess helps me to diagnose the flaws and to understand better what’s going on under the hood.

Finally,  playing chess also helps me to detect the chess player needs, so I realized the main missing feature from Mobialia Chess: a chess database to review historic games and to analyze your own games searching statistics for each position. This year I worked to implement this feature and starting today you can access a Beta version of the database in Mobialia Chess Web (http://chess.mobialia.com).


Benchmarking Java to native compilers

Java Duke

Java to native compilers have been around for some years, and I was curious about if one of this solutions could improve the performance of my Carballo Chess Engine.

I ran a tournament between binaries of the Carballo development version (1.5) compiled with different solutions to compare the performance. I used cutechess-cli to run a 3000 game tournament with time control 5″ + 0.1″ per move by side and with the Noomen Test Suite as the starting positions.

The compared binaries

  • The Pure Java Version: This is the carballo-1.5.jar ran with the Oracle JDK 1.8.0_73 VM under my 64bit linux (Debian Sid).
  • GCJ: The GNU’s Java compiler, incomplete and unfinished, but it works for Carballo. This binary was compiled with this script.
  • Excelsior Jet: A classic proprietary Java to native converter at http://www.excelsiorjet.com. I used Excelsior Jet 11 32bit for Linux (evaluation) to generate this binary. The 64bit version had worse results.
  • RoboVM: (https://robovm.com) A solution to run Java apps on iOS. Recently it was bought by Xamarin, and after the Microsoft acquisition of Xamarin, RoboVM was discontinued. RoboVM also has the option to compile Java apps to desktop binaries. I built this binary with the last RoboVM free version (1.8). Now RoboVM is forked in BugVM, but I was not able to build the binary with BugVM.
  • C# compiled with Mono: There is a C# version of Carballo converted with the Sharpen tool. I compiled this binary with MonoDevelop 5.10. The converted code is sub-optimal but it is a good solution if you need a native version (or if you need to integrate Java code in a C# project).

Test results

Rank Name                          ELO   Games   Score   Draws
   1 carballo-1.5-gcj               89    1200     62%     28%
   2 carballo-1.5                   37    1200     55%     27%
   3 carballo-1.5-mono              -5    1200     49%     30%
   4 carballo-1.5-jet              -33    1200     45%     28%
   5 carballo-1.5-robovm           -88    1200     38%     27%

Conclusions

The JVM performance is very good, better than almost all the Java to native solutions.

The exception is GCJ, but it’s incomplete and it will not work for all the Java apps.

I expected better results from Excelsior Jet, as some time ago Carballo Jet binaries where available an used for testing.

The C# version is a bit worse but acceptable.


Vender en Google Play desde España

Por aclamación popular os cuento los requisitos legales para vender aplicaciones en Google Play desde España. Me centraré en el caso de vender como trabajador autónomo, que es como estoy facturando en Mobialia. Puedes comprar muchas cosas en Google Play hasta video juegos en los cuales podras usar servicios de elo boost por parte de http://elitist-gaming.com.

CONSIDERACIONES SOBRE GOOGLE WALLET

En el Google Play los pagos se hacen a través de la plataforma Google Wallet. En Google Wallet no tenemos facturas, sólo tenemos las órdenes de venta, que son una especie de albaranes y los pagos mensuales que nos manda.

La entidad gestora de Google Wallet, Google Payment Limited (GPL) es una entidad intermediadora en el pago que no cuenta para nada (bueno sí, para enviarte el dinero).

ALTA EN HACIENDA

Para poder facturar hay que darse de alta en hacienda (modelo 036). Yo me puse en el epígrafe IAE 213 Ingenieros de Telecomunicación, cada caso personal tendréis que estudiarlo. En este formulario también escogí la modalidad de estimación directa simplificada.

Suele ser útil darse de alta en el registro de operadores de IVA intracomunitario, que necesitaréis si vais a emitir facturas a empresas europeas sin IVA.

ALTA EN SEGURIDAD SOCIAL

También es necesario darse da alta en la Seguridad Social como autónomo (modelo TA.0521) escogiendo una base de cotización según la que pagarás una cuota mensual.  Yo estoy pagando a la seguridad social 267,03 euros mensuales con la base de cotización mínima. Aunque tengas otro trabajo en el que ya estés cotizando a la seguridad social, este trámite es obligatorio.

Teóricamente si tu actividad no se considera “habitual” no tendrías que pagar esta cuota, y según la jurisprudencia vigente la actividad es habitual si generas más que el salario mínimo interprofesional. De todas formas podrías meterte en un lío si no la pagas…

TRÁMITES PERIÓDICOS

Al estar dado de alta con el 036, tenéis la obligación de presentar trimestralmente el formulario 303 de autoliquidación de IVA (pones facturas de compra, facturas de venta y pagas la diferencia de IVA entre las ventas y las compras. Anualmente también hay que presentar el formulario 390 (que es un resumen recapitulativo del IVA).

Si tenéis operaciones de IVA intracomunitarias (si se cobran anuncios de Admob o Adsense, por ejemplo) también hay que presentar trimestralmente el modelo 349, que es un modelo informativo en el que se detallan estas operaciones (además de ir su total reflejado en el 303).

También se está obligado a presentar trimestalmente el formulario 130 de pago fraccionado del IRPF, en el cual anticiparemos a la AEAT un 20% del beneficio trimestral para la próxima declaración de la renta.

En la declaración de la renta, en la sección de ingresos por estimación directa, pones los ingresos, gastos, pagos a la seguridad social como autónomo y pagas por los beneficios dependiendo del tramo de renta en el que estés.

IVA DE LAS VENTAS EN GOOGLE PLAY

En un post anterior comentaba los Cambios a partir del 1 de enero de 2015.

Desde 2015 es Google quien vende las apps directamente a los usuarios, y el desarrollador factura a Google, de forma similar a como se facturan las ventas en Amazon Appstore. La diferencia es que en este caso se le factura todo a Google Inc. USA. como se entiende al leer las Condiciones de Servicio de Google Play.

FACTURA DE COMPRA A GOOGLE POR LAS COMISIONES DEL 30%

Google no te manda ninguna factura, sólo tienes las órdenes de Google Wallet y los informes financieros de Google Play. Yo mensualmente introduzco una factura de compra a Google Inc USA pagándole las comisiones que me descuenta de las ventas (30%). Esta factura está exenta de IVA, y Google debería mandármela, pero como no me la manda, me la “invento”, ya que me la está cobrando implícitamente.

FACTURAS DE VENTA A ADMOB O ADSENSE

Si monetizáis aplicaciones a través de Admob o webs a través de Adsense, los ingresos se le facturan a Google Ireland, por lo que necesitaréis ser operador de IVA intracomunitario, ya que las facturas son también sin IVA, y trimestralemente tenéis que informar de estas facturas en el modelo 349.

Recordad que yo no soy un experto fiscal, simplemente os estoy contando mi experiencia, por lo que agradeceré comentarios y correcciones.


Cambios en el IVA para las ventas en Google Play

euro

A partir del 1 de enero de 2015 entran en vigor nuevas reglas de IVA para la prestación de servicios TRE (Telecomunicaciones, Radiodifusión y TV, y Electrónicos) en la Unión Europea y afecta a las ventas de apps en Google Play. Anteriormente a las apps se les aplicaba en Europa el IVA del país desde el que eran vendidas, pero ahora se les va a tener que apicar el IVA de cada uno de los países en los que se vendan.

Hasta ahora éramos los desarrolladores europeos los que nos encargábamos de recaudar el IVA y pagarlo a la agencia tributaria de nuestro país, y con este cambio habría que pagar el IVA recaudado en cada país a cada una de sus agencias tributarias. Para simplificar este proceso se va a poner el marcha la ventanilla única (Mini-One-Stop-Shop o MOSS) que, aunque simplificaría algo el proceso, seguiría siendo complejo….

Google al rescate

Afortunadamente Google acaba de anunciar que a partir del 1 de enero se va a encargar de recaudar el IVA y presentarlo ante las agencias tributarias de los países europeos, liberando a los desarrolladores de esta responsabilidad:

https://support.google.com/googleplay/android-developer/answer/138000

Por lo tanto a partir de ahora es Google quien vende las apps directamente a los usuarios, y luego el desarrollador facturará a Google, de forma similar a como se facturan las ventas en Amazon Appstore. La diferencia es que en este caso se le factura todo a Google Inc. USA. como se entiende al leer las Condiciones de Servicio de Google Play.

También se cambiará la forma de incluir el IVA en los precios: hasta ahora se le sumaba el IVA al precio especificado por el desarrollador, ahora el precio final pasará a llevar incluído el IVA (Tax-Incusive-Pricing).

Puedes comentar este post en Google+.